A “not secure” warning in Chrome indicates that a website lacks HTTPS encryption, leaving sensitive data like passwords and credit card details at risk of being intercepted. To resolve this, site owners must install an SSL certificate, while visitors should avoid sharing private information and verify their own device settings or browser cache.
When the Google Chrome browser displays the “Your connection to this site is not secure” warning, it means the website you’re visiting is not using proper encryption to protect your data.
In fact, more than 95% of websites rely on encrypted connections, and Google’s recent test of the “Always Use Secure Connections” setting showed that Chrome displays this warning in less than 3% of navigation.
This warning matters because any information you enter, such as passwords, credit card numbers, or personal details, can be intercepted. It tells your site visitors that they should refrain from entering sensitive data until the issue is resolved. If you’re the website owner, the warning damages trust, hurts search rankings, and causes your visitors to leave.
The good news is that most connection security issues are straightforward to identify and resolve.
What a “Connection Not Secure” Error Means for Site Owners and Visitors
A “connection not secure” website warning means the website isn’t protecting your information while it travels from your device to its server. Basically, it’s like having a conversation in a crowded room where anyone nearby can listen in, rather than talking privately in a closed room where only you and the other person can hear what’s being said.
This warning appears when a site uses HTTP instead of HTTPS, and it affects website owners and visitors differently.
Let’s break down what this means for each group.
For Website Owners
Your site gets marked as “not secure” when you don’t have a Secure Sockets Layer (SSL) certificate installed, your certificate has expired, or there are errors in your HTTPS setup. Even with a valid certificate, problems such as mixed content (loading resources over HTTP on an HTTPS web page) or incorrect redirects can trigger the warning.
Google also uses HTTPS as a ranking factor, meaning sites without proper encryption may rank lower in search results and lose traffic to competitors.
Most importantly, if your site has login, payment, or contact forms, this warning is especially damaging, as visitors will find it hard to trust you with sensitive information such as their credit card details.
For Website Visitors
When you visit a site without proper security, Google Chrome displays warnings such as “not secure” in the address bar, with a crossed-out padlock icon. In some cases, a full blocking page even displays “Your connection is not private.”
These warnings indicate that any data you enter, such as passwords, credit card numbers, addresses, or personal details, could be intercepted by hackers, especially when using public WiFi.
Here’s what you should do as a visitor if you land on an unsecured site:
- Never enter passwords or payment information on these sites
- Avoid submitting any personal data through forms
- Don’t click on any insecure links
- Consider contacting the website owner to alert them about the issue
While it’s generally safe to read articles or browse informational content on these sites, you should avoid any interactions that require you to submit information. When in doubt, look for the padlock icon in your browser before sharing any sensitive information.
What Are the Common Causes of “Connection Not Secure” Error in Chrome?
The error stems from several distinct issues, each requiring a different fix. Let’s explore the most common causes so you can recognize which one matches your situation:
- Missing, misconfigured, or invalid SSL/TLS
- Expired SSL certificates
- Pages that load unsecure images or files
- Redirect and “force HTTPS” problems
- Browser, device, and network issues (visitor-side)
Missing, Misconfigured, or Invalid SSL/TLS
The most common cause is not having an SSL certificate installed on your web server. SSL certificates are digital files that encrypt the connection between a visitor’s browser and your website. Without one, your site runs on HTTP instead of HTTPS, and that triggers Chrome’s security warning immediately.
However, even if you have a certificate, it may still be misconfigured. This happens when the certificate is installed incorrectly, doesn’t match your domain name, or isn’t trusted by browsers because it’s self-signed or issued by an unrecognized authority.
Invalid certificates due to technical errors or security concerns will trigger the same warning as if no certificates were present at all.
Expired SSL Certificates
SSL certificates have expiration dates, typically ranging from 90 days to 1 year, depending on the certificate authority. When a certificate expires, browsers like Google Chrome or Mozilla Firefox immediately flag the site as insecure because they can’t verify the site’s identity or encryption. This is one of the easiest problems to overlook, especially if you set up SSL once and forgot about it.
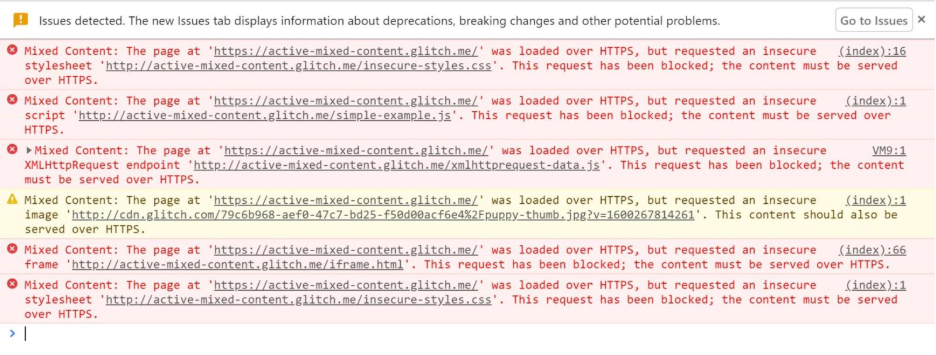
Pages That Load Unsecure Images or Files
Mixed content occurs when your main page loads over HTTPS, but some elements (e.g., images, scripts, style sheets, and other files) on that page still load over HTTP.
Even though your certificate is valid and properly configured, Chrome will show a warning because the page isn’t fully secure. This often occurs after migrating from HTTP to HTTPS, but without updating the hardcoded website URLs in your content, theme files, or plugins.
A single HTTP image on an HTTPS protocol page is enough to trigger the warning. Common culprits include embedded images from external sites, third-party scripts, or content from content delivery networks (CDNs) that haven’t been updated to HTTPS.
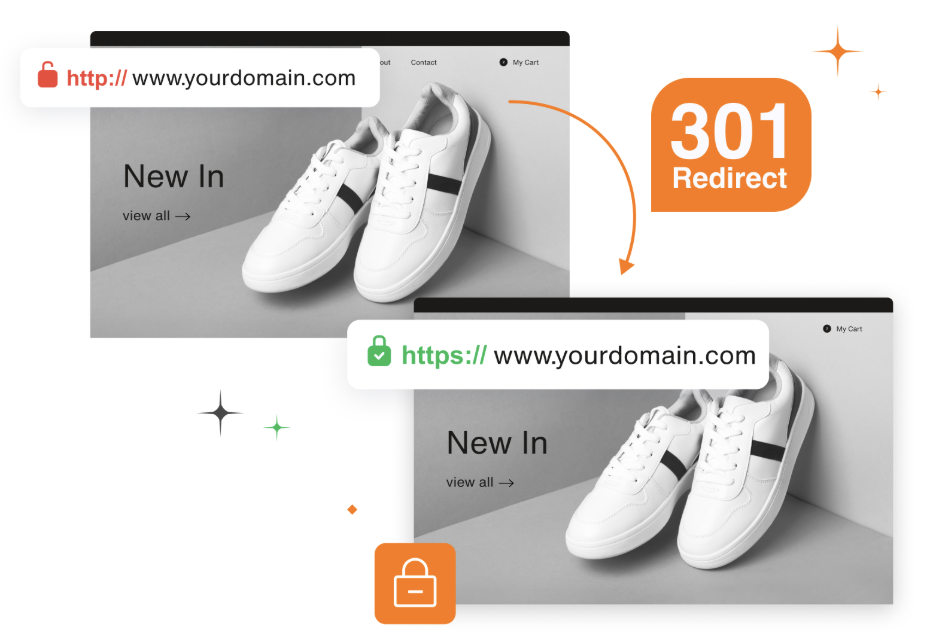
Redirect and “Force HTTPS” Problems
Visitors can still access your site through HTTP if you haven’t set up proper redirects, even with a valid SSL certificate installed. When someone types your domain without “https://” or clicks an old HTTP link, they’ll land on the non-secure version of your site, triggering the warning.
Redirect issues can also include redirect loops (where HTTP and HTTPS pages redirect to each other in a loop), partial redirects (only some pages redirect to HTTPS), or conflicting redirect rules in your server configuration, .htaccess file, or CMS settings.
These misconfigurations confuse browsers and can prevent proper HTTPS enforcement across your entire site.
Browser, Device, and Network Issues (Visitor-Side)
Sometimes the problem is on the visitor’s end. Outdated browser versions might not recognize newer SSL certificates or security protocols. Device problems, such as incorrect system date and time settings, can cause certificate validation to fail because SSL certificates have specific validity periods.
Network-level issues include overly aggressive security software, VPN services that interfere with SSL connections, public Wi-Fi networks that inject content or modify connections, browser extensions that block or alter security protocols, or cached SSL data from previous connection attempts.
Corporate or school networks with content filtering can also trigger false warnings, even when the site itself is properly secured.
How Site Owners Can Fix a “Not Secure” Error in Chrome With SSL and Redirects
Here’s how to remove the “connection not secure” website warning by fixing SSL and HTTPS configuration issues step by step:
- Choose the exact domain
- Install an SSL certificate
- Force HTTPS redirect sitewide
- Fix mixed content
- Clear caches and test redirects
- Re-check key pages after HTTPS and redirect changes
Step 1: Choose the Exact Domain
This step ensures that SSL and redirects apply to a single version of your site.
Decide which version of your domain you will use everywhere:
- https://example.com
- https://www.example.com
Pick one and stick to it across hosting settings, CMS settings, and redirects. Avoid splitting traffic between both versions.
Why this matters
- SSL certificates attach to a specific domain
- Redirect rules depend on a single target URL
- Mixed setups trigger warnings
Step 2: Install an SSL Certificate
You need to secure your website by encrypting the connection between your site and your visitors. Start by checking whether your site already has an SSL certificate installed.
If so, review the expiration date and ensure the certificate is set up correctly. An expired certificate or a broken installation still triggers Chrome warnings, so renewing or reinstalling it is often enough to fix the issue.
If your site does not have SSL yet, you will need to install one that matches the exact domain you chose earlier. You can use our SSL certificates that work across common hosting setups and include clear setup guidance. We provide domain-validated SSL for basic websites and organization-validated SSL for businesses that want stronger trust signals and to enhance security.
Once the certificate is installed or renewed, open your site in a browser and confirm that it loads with https:// and shows a locked padlock icon.
Step 3: Force HTTPS Redirect Sitewide
After setting up your SSL, the next step is to automatically send every visitor to the secure version.
You’ll set this up using redirects, which means you’ll forward all HTTP requests to the HTTPS version of your site. For example:
- http://yourdomain.com → https://yourdomain.com
http://www.yourdomain.com → https://yourdomain.com
You can configure these redirects in the following places:
- Hosting control panel
- .htaccess file
- CMS settings, such as WordPress General Settings
After enabling redirects, test multiple pages by entering HTTP URLs directly and confirm that each one switches to HTTPS and shows a locked padlock icon.
Step 4: Fix Mixed Content
Remove insecure files from pages that already load over HTTPS. As mentioned earliers, mixed content occurs when a secure page still pulls images, scripts, stylesheets, or other resources over HTTP, which triggers Chrome’s “not secure” website warning even with a valid SSL certificate in place.
Here’s what to do:
- Update all resource URLs to use HTTPS, including images inside page content, theme files, plugins, and third-party scripts.
- Use Chrome DevTools by right-clicking the page, selecting Inspect, and checking the Console for mixed content warnings.
Step 5: Clear Caches and Test Redirects
Remove outdated versions of your site that may still trigger warnings, and make sure to clear:
- Your browser cache
- Your CMS or plugin cache
- Your hosting cache
- CDN cache you use
After clearing everything, open a new browser window and enter your site using an HTTP URL. Confirm that it automatically redirects to the HTTPS version and displays a locked padlock icon on every page you test.
Step 6: Re-Check Key Pages After HTTPS and Redirect Changes
This step confirms that your most important pages remain fully secure. Open login pages, checkout flows, contact forms, and account pages, and verify that each one loads over HTTPS without warnings.
Check the browser address bar for a stable padlock icon and review the page using Chrome DevTools to confirm there are no hidden security errors.
How Site Visitors Can Fix a “Not Secure” Error in Chrome
Here’s how website visitors can resolve a connection to this site warning when the Google Chrome browser shows a secure warning or error message:
- Check the website address and open a new window
- Clear browser cache and SSL data
- Check your device date and time
- Disable extensions and test again
- Check your internet connection
- Use advanced options with caution
Step 1: Check the Website Address and Open a New Window
Start by checking the website address in the browser’s address bar. Ensure the web address is spelled correctly and does not contain extra characters. Even a small typo in the site address can cause a connection error.
Next, open a new Google Chrome window or an Incognito window and try loading the page again. This helps rule out session issues stored in the user’s browser and answers common questions about why Chrome displays a secure connection error.
Step 2: Clear Browser Cache and SSL Data
If the warning persists, clear your browser cache, cookies, and saved files. Then, clear the browser’s SSL cache, close Chrome completely, and reopen it.
Old cached data or outdated certificate information often causes Chrome to treat a secure website as lacking secure connection, even when the site owner has fixed the issue. This step helps unblock non-secure sites that are caused by stored errors rather than genuine security problems.
Step 3: Check Your Device Date and Time
A wrong system clock breaks SSL certificate checks. Check your device settings and enable the option to set time zone automatically.
When the date or time is incorrect, Chrome may flag the HTTPS connection as unsafe because the certificate appears expired or invalid. Fixing this often removes repeated warnings.
Step 4: Disable Extensions and Test Again
Browser extensions sometimes interfere with HTTPS encryption. Temporarily disable VPNs, ad blockers, or security extensions, then reload the web page. If the site loads correctly afterward, one of the extensions is blocking the secure connection. Re-enable extensions one at a time to identify the cause.
Step 5: Check Your Internet Connection
Network issues often trigger false warnings. Switch Wi-Fi networks, restart your router, or try a different and more secure connection, such as mobile data. Once you resolve connection issues, check the site again to see if you still see the warning.
Public Wi-Fi, corporate networks, or filtered connections sometimes block HTTPS URLs or modify traffic, which can cause Chrome to show a “not secure” warning even on a secure website.
Step 6: Use Advanced Options With Caution
If you trust the site and only need temporary access, click ‘Advanced’ on the Chrome warning screen and choose the option to proceed (if available).
Chrome also includes experimental flags under chrome://flags, but changing them reduces user safety. Advanced bypass methods, such as developer commands or hidden prompts, ignore certificate checks and should only be used for testing trusted sites, never for everyday browsing.
If none of these steps work and you are unsure whether the site is safe, avoid entering login credentials or other sensitive data. At that point, the safest option is to leave the page and contact the website owner to resolve the issue.
Post-fix “Not Secure” Error Checklist
After fixing the “connection not secure” website error, don’t assume everything will stay secure forever. SSL certificates expire, website updates can break things, and new content might create security gaps.
Here’s how to verify your fix works and keep your site secure going forward:
- Run a security scanner: Use free tools like WhyNoPadlock.com or SSL Labs Server Test to scan your entire site for potential issues you may have missed. These tools provide a detailed report that shows exactly what still needs fixing, from mixed content to certificate issues.
- Test your important pages: Don’t just check your homepage. Make sure these pages all show a solid padlock icon with no warnings: login pages, checkout and payment pages, contact forms, and your most popular pages. Open your browser’s console (right-click and select “Inspect”) to check for any hidden warnings on each page.
- Turn on auto-renewal for your certificate: Expired certificates are one of the most common reasons the warning comes back. Most hosting providers offer automatic renewal; enable it in your control panel now. Set a calendar reminder for 30 days before your certificate expires as a backup. If you’re using Let’s Encrypt (a free option), auto-renewal is typically enabled by default.
- Check your site regularly: Run a security scan every few months using the same tools mentioned above. Set up monitoring services like UptimeRobot (free) to alert you if your site goes down or starts showing warnings. You can also use Google Search Console to catch security issues Google finds. Add these checks to your regular maintenance routine, right alongside backups and updates.
Bonus tip: Enable HTTP Strict Transport Security (HSTS) on your site. This forces browsers to always use the secure HTTPS connection, even if someone types in the old HTTP address or clicks an outdated link. Many hosting providers allow you to enable this feature with a simple checkbox in your control panel.
Why Fixing “Not Secure” Error in Chrome Matters
Fixing the “not secure” website error in Google Chrome protects user data, preserves trust, and prevents traffic and revenue loss.
Here’s why it matters:
- Security: A website marked as “not secure” sends data over HTTP traffic, which lacks encryption. This exposes information to interception and increases the risk of phishing attacks. Without a secure HTTPS connection, data transmitted between the user’s browser and the website server stays vulnerable, especially on public networks.
- Trust and user experience: When Chrome displays a security warning, users hesitate. Many abandon login pages, checkout flows, and e-commerce forms rather than risk sharing sensitive data. A visible lock icon signals a secure website, reassures visitors, and supports smoother conversions across key pages.
- SEO and business impact: Such connection warnings reduce click-through rates and increase abandonment. Search engines favor sites that implement HTTPS and support encrypted connections. Fixing the issue improves organic visibility signals, keeps users engaged, and helps website owners protect traffic, leads, and sales.
Frequently asked questions
Why does my site still say “not secure” even after installing SSL?
This usually means the SSL certificate installed is not working across the entire site. Common causes include mixed content where some files still load over an HTTP connection, missing redirects that fail to support HTTPS, cached SSL data in the browser cache, or an expired or invalid SSL certificate. Once every website address redirects to the proper version of your page and all resources load over HTTPS, Chrome shows the lock icon and removes the warning.
Do I need a special SSL for e-commerce or login pages?
No. Any valid SSL certificate provides HTTPS encryption and protects login credentials, payment data, and other sensitive information. Some e-commerce sites choose higher-level validation certificates to display business details, but free SSL certificates and basic options still create a secure connection when properly configured.
Is it safe to use a site when Chrome says the connection is not secure?
Reading content on an unsecure website carries low risk, but entering passwords, payment details, or form data is unsafe. Data sent over HTTP is not encrypted and increases exposure to interception. If Chrome displays a warning in the address bar, avoid sharing sensitive data and wait for the site owner to fix the issue.
Never Show “Not Secure” Error Messages Again
Fixing the “connection not secure” website warning keeps your site safe and helps people trust it. When your site uses HTTPS, it locks the data that moves between your site and your visitors. That means passwords, forms, and payments stay protected. It also stops visitors from leaving as soon as they see a warning message in the browser.
If you want this to remain fixed in the long term, you need the right setup behind the scenes. That includes a valid SSL certificate, proper redirects, and timely renewals. We offer this with simple setup steps and renewal support, so your site stays secure without extra work.
Give visitors a safe, trusted experience every time they visit. We at BigRock help you do that and move forward with confidence.