Getting Started with Plesk
Logging In to Plesk for the First Time
You can log in to Plesk by visiting the following URL:
https://<Plesk server's address>:8443
where <Plesk server's address> is either the domain name or the IP address of the Plesk server. Type in your username and password to log in. When you are logging in to Plesk for the first time, the scenarios will differ depending on whether you are a shared hosting customer, or an administrator managing your server.
Logging In as a Shared Hosting Customer
When you first log in to Plesk as a shared hosting customer, you will be asked to fill out a form with contact information, such as:
- Your company name.
- Your phone number and email.
- Your address and country of residence.
This information will be used by your provider to contact you in case of possible issues. The form also enables you to set a new password for your user account. This password is used together with your username to log in to Plesk. You cannot change your username by yourself. If you want to change your username, contact your provider.
Logging In as the Server Administrator
When you first log in to Plesk as the server administrator, you will be presented with several forms that will record your personal information and help you set up the initial configuration of Plesk. Here are the steps in succession:
- Plesk license agreement. You will need to accept it to proceed further.
- Initial configuration. You will need to do the following:
- Specify the full hostname of the server.
- Select the default IP address.
- Separate all IPs on the server into shared and dedicated addresses.
- Specify the new Plesk administrator password.
- A form containing your personal information. You will need to fill it out to proceed further.
- Plesk interface selector. You will need to select the purpose for the server, and also choose between one of the two Plesk interface options:
- Power User view. Choose this interface if you are a web admin managing websites of your customers.
- Service Provider view. Choose this interface if you are a shared hosting provider and plan to sell hosting to customers who will manage their websites themselves.
- Provide your Plesk license key. You can upload a .ZIP archive, an .XML file, or specify the activation code.
- If you have chosen Power User view, configure your first webspace. You will need to specify the following:
- Domain name.
- IP address.
- System user username and password.
Plesk User Interface Explained
Different users in Plesk have very different needs and usage scenarios. While the provider may need to set up service plans and configure server-wide settings, a customer may need to create a database or change PHP settings for one of their domains. To accommodate every party, Plesk provides two different panels, described below:
- The Customer Panel. It is focused on web hosting operations and features the tools necessary to create and manage websites, mailboxes, and so on. This panel is designed for hosting customers, and allows managing subscriptions.
- Power User view. It includes all the tools available in the Customer Panel, as well as the tools that enable managing server-wide settings. This view is best-suited for server administrators hosting their own websites, and web studios who manage websites of their customers. It allows managing webspaces.
Because this guide is meant for shared hosting customers and web designers who host their customers’ websites, we will focus on the Power User view. Let us take a look at a screenshot displaying Plesk in Power User view and examine it.
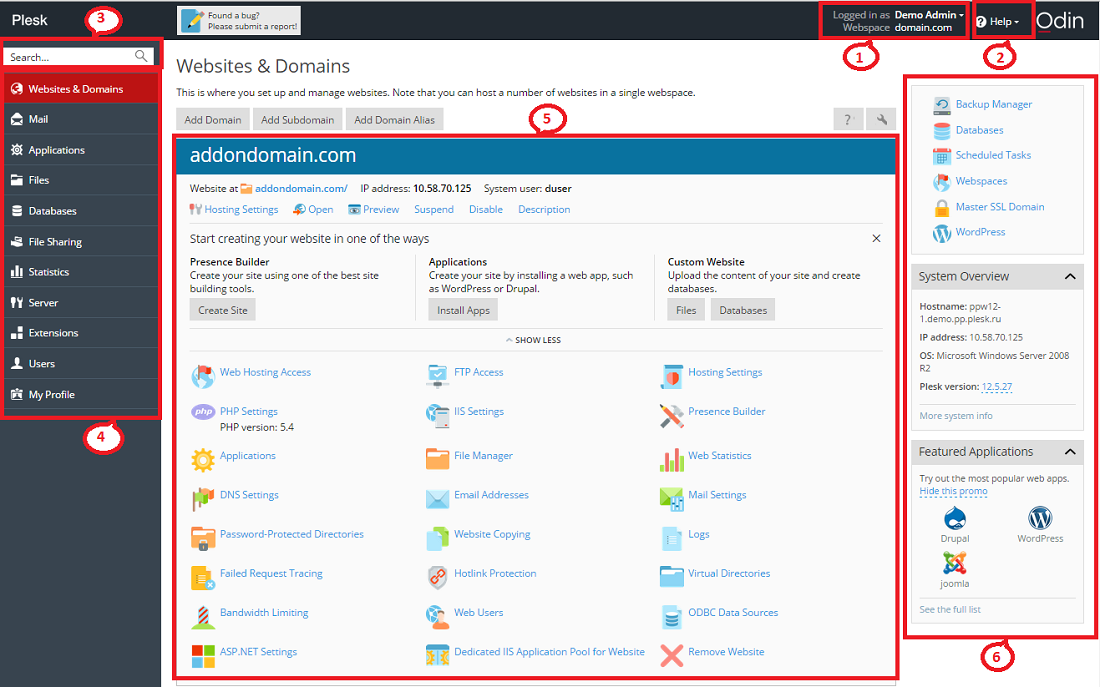
- This section displays the name of the user who is currently logged in, and the currently selected subscription. The user can change the properties of their user account and choose what subscription they want to manage.
- This section contains the Help menu. The Help menu lets users access a context-sensitive online guide and watch video tutorials.
- This section features the Search field.
- This section holds the navigation pane that helps to organize the Plesk interface. Tools are grouped by function, for example, the tools enabling users to manage web hosting settings are found on the Websites & Domains page, and those enabling to manage mail accounts are found on the Mail page. Here is a short description of all the tabs and the functionality they enable:
- Websites & Domains. Tools present here enable customers to add and remove domains, subdomains, and domain aliases. They also enable them to manage various web hosting settings, create and manage databases and database users, change their DNS settings, and secure their websites with SSL certificates.
- Mail. Tools present here enable customers to add and remove mail accounts, as well as manage mail server settings.
- Applications. Tools present here enable customers to easily install and manage a wide range of web applications.
- Files. This item features a web-based file manager that enables customers to upload content to their website, as well as manage the files already present in their webspace.
- Databases. This item allows customers to create new or manage existing databases.
- File Sharing. This item features a file-sharing service that enables customers to store personal files, as well as share files with other Plesk users.
- Statistics. This item features information about disk and traffic usage, as well as the link to web statistics that present a detailed overview of the site’s visitors.
- Server. This item is only visible to the server administrator. It features tools that enable the administrator to configure server-wide settings.
- Extensions. This item enables customers to manage extensions installed in Plesk and access the functions provided by these extensions.
- Users. Tools present here enable customers to add and remove user accounts that enable other people to log in to Plesk.
- My Profile. This item is only visible in the power user view. Contact details and other personal information can be reviewed and updated on this tab.
- Account. This item is only visible in the Control Panel of shared hosting customers. It features information about resource usage for the subscription, allowed hosting options and granted permissions. Tools present here enable customers to retrieve and update their contact details and other personal information, and also back up their subscription settings and websites.
- This section houses all the controls relevant to the tab that is currently open. On the screenshot, the Websites & Domains tab is open, and so the various tools that allow managing aspects of the subscription related to web hosting are displayed.
- This section contains a mix of various miscellaneous controls and information displays featured for users' convenience.